
Navajo Chapters – Website Resources
Table of Contents
Click the links below to be guided to the specific section on the page.
Real Time Solutions Website Training Recording for Navajo Nation Chapters
RTS Training for Navajo Chapters
12-17-2020 (Morning)
RTS Training for Navajo Chapters
12-17-2020 (Afternoon)
RTS Training for Navajo Chapters
12-22-2020 (Morning)
RTS Training for Navajo Chapters
12-22-2020 (Afternoon)
Logging in and the “Dashboard”
You can log in to your chapter website by going to your website and adding a /505login to the end of the domain in the browser.
For example, if your chapter were www.example.navajochapters.org you would type www.example.navajochapters.org/505login into your browser.
Once you do this you will be directed to the login screen. The Navajo Nation Chapters Administration will provide each chapter their login information.
Once you log in to the website you will be directed to the “Dashboard”.
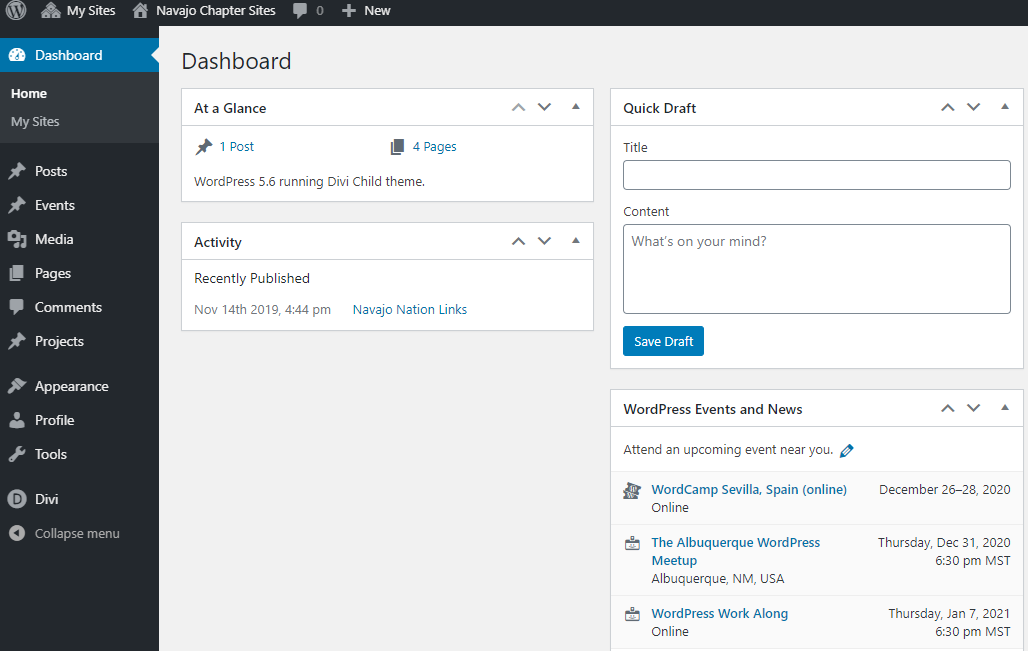
There are a few key components to the Dashboard that you will need to know the function of and how to navigate. These are the option located on the side black bar on the left. The information in the middle is mostly just general news and updates for WordPress that do not have any bearing on the site content.
Important to Note
Most of your content updates will take place on the “Front End” or on the website pages themselves rather than through the Dashboard. Content updates will be facilitated through the “Divi Builder” which allows you to update, change, and create content in real-time on the page in an intuitive way.
However, it is important to understand the Dashboard and its functions as there are some tasks that require its use.
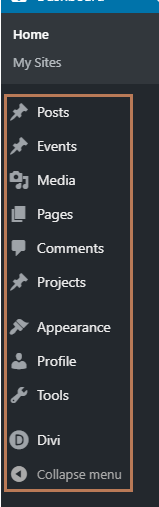
1. Posts – a directory and menu for creating and editing blog posts
2. Events – where events are created and managed for your calendars
3. Media – the central repository for all documents, pictures, audio files, etc. You can upload and access media through this menu.
4. Pages – This is the central library for all your pages and drafts. You can sort, create, edit, and find all page settings here.
5. Comments – this is not particularly relevant and should be turned off for most sites.
6. Appearance – This is where you can update the menu items on your website.
7. Profile – Here you can manage your profile. You are able to update your password, change your email, etc.
8. Tools – This is not active.
9. Divi – This is where you can go to access and edit the Header and Footer of the website.
Understanding the "Divi Builder" Setup
The “Divi Builder” is the tool you will use to edit and create content on your website pages. This is not accessed through the Dashboard but rather on the pages themselves.
To get started editing content you will want to navigate to your website from the Dashboard once you have logged in. To do this just click on your chapter name in the top left corner of the window and select “Visit Site”
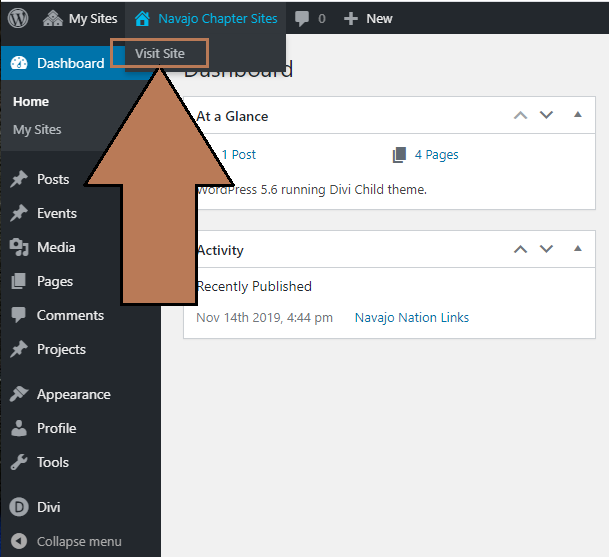
After selecting “Visit Site” from the dashboard, you will take you to the homepage of your Chapter website. You will notice that there is now a blue menu bar at the top of your window with several options. This shows you that you are viewing the website while logged in as an Administrator.

Any time you would like to edit the content on the page you will just select “Enable Visual Builder”
Selecting this will engage the “Divi Builder” which allows you to edit and add content.
Once the builder is engaged you will see several different types of boxes that encompass the different areas on the page. These are the different containers that are used to build out the page content. There are three types of containers used by the builder.
1. Sections – These are the highest level content container and define an area on the page where multiple pieces of content work together within modules and rows to convey a mutual message to the user. Sections are denoted by Blue and Orange squares.
2. Rows/Columns – Rows are the area within a row that define spatial relations and orientation of the different types of content modules. Within each row are certain types of columns of different sizes. Some rows can four columns of equal size or two columns, one big and one small. The best way to think of Rows and Columns is to be similar to inserting a table on Microsoft Word. Within a table, you have many cells where you enter information. In this case, the cells are the columns and the information you enter is a content “Module. Rows are denoted by Green/Turquoise Squares.
3. Modules – Modules are different tools that allow you to add different types of content to the site. Each module is specialized for certain types of content. For example, there is an Image module, a Text module, and a button module. These are three common module types used throughout the site. You can create content by adding new modules or edit existing content by going into individual module settings. Modules are denoted by Black/Gray sqaures.
Additional Materials
To better understand the dynamics for these three types of content containers used by the Divi Builder refer to the following resources:
Web Tutorials
Video Tutorials
Sections Rows and Modules
Divi For Beginners
Getting Started with Divi
Understanding The Settings Menu
As you hover over the different pieces of content you will see a small menu that pops up for Sections, Rows, and Modules. This menu has several icons that denote certain functions. The icons are the same for every content type.
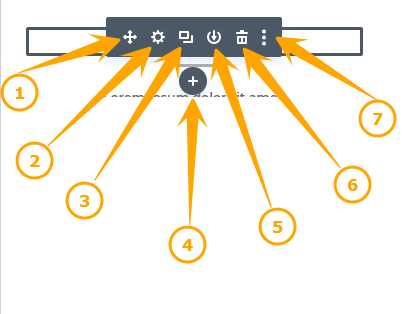
If you hover over each icon with your cursor for a second will pop up the name of that specific icon. The functions of the icons on the menu are as follows”
1. Move Module – This allows you to click and hold the module so that you can drag and drop it into another column on the page. You can move Sections, Rows, or modules anywhere on the page by dragging and dropping them with this function. A small black shadow appears on the page to denote where the module will land.
2. Settings – This is the main function you will use during your content management. This icon pulls up a new menu where you can edit, update, and create content within that specific module.
3. Duplicate – This function will duplicate whatever content is within that particular Section, Row, or module right below the original. You can then edit/move or modify that content as needed. This prevents you from having to constantly build everything from scratch.
4. Add New – This function allows you to add a new Section, Row, or Module below the one you selected. An additional menu pops up when selecting this icon with the different options available to add.
5. Download – This allows you to download and save your content Section, Row, or Module. These are saved as a template to your library. You can then add this piece whenever needed in the future.
6. Trash/Delete – This deletes the specific content off the page. You can always undo any action by hitting Ctrl + Z.
7. Additional Options – This pulls up a menu with additional options which we will address later.
Basic Types of Modules
There are many types of Modules. However, there are a few that are used the vast majority of the time. These are the basic fundamental content modules that are used every day. They are:
1. Text Module
2. Image Module
3. Button Module
4. Blurb Module
Attention
To better understand the builder and module please read this excelent article that goes over them in more detail:
Module Tutorials
Please use the resources below to learn about the four major content modules, how they function, and how to make updates and edits to them.